DIY Embroidery on Jeans
Fashion icon Coco Chanel once said, “Fashion is not something that exists in dresses only. Fashion is in the sky, in the street; fashion has to do with ideas, the way we live, what is happening.” This idea captures the spirit of personalizing your wardrobe. It’s about making your clothes a true reflection of you.
That runway-ready look of embellished denim has been a stylish favorite for decades. Instead of buying expensive pre-decorated pieces, you can create your own. This gives you endless options for colors and designs. You take pride in crafting something completely unique.
Working with denim is surprisingly simple. It’s a fantastic method to give old garments a fresh, new life. You can cover a stain, mend a worn spot, or add a bold pattern. This craft is perfect for making a personal statement or adding fun characters to a child’s backpack.
The joy of wearing something you made by hand is special. It’s a one-of-a-kind detail that you won’t find in any store. This guide will show you how easy and rewarding this creative journey can be.
Key Takeaways
- Personalizing your denim is a powerful way to express your individual style and creativity.
- Creating your own embroidered pieces is often more affordable than buying designer versions.
- This craft allows you to repair and revitalize old jeans, giving them a beautiful second life.
- You gain complete control over the design, colors, and placement to match your personal taste.
- The satisfaction of wearing a handmade, unique item is unmatched.
- This skill is versatile, suitable for everything from bold adult fashion to whimsical kids’ items.
- The process is accessible for beginners and offers a relaxing, rewarding creative outlet.
Materials and Preparations for Embroidering on Denim

Proper preparation is the secret ingredient that turns a simple denim piece into a stunning work of wearable art. Having everything organized before you start makes the creative process flow smoothly.
Gathering Essential Tools & Supplies
Your choice of needle matters greatly when working with thick fabric. Chenille needles in sizes 18 to 22 work best because they’re sharp and strong enough to pierce denim without bending.
Select durable embroidery floss that can withstand washing. Using shorter lengths of thread and thread conditioner helps prevent wear. You’ll also need an embroidery hoop to keep your fabric taut.
Water-soluble stabilizer is magical for transferring designs. It sticks to your denim, guides your stitching, then dissolves completely in water. Iron-on backing protects your stitches from snagging.
Prepping Your Denim Fabric Properly
Always wash and dry your denim before starting. This crucial step prevents shrinking or warping when you launder your finished piece for the first time.
Consider various sources for your project. You can use new jeans, revive forgotten items from your closet, or find special pieces at second-hand shops. This approach is both economical and eco-friendly.
Organize your workspace with all supplies within reach. Having your tools accessible makes hand embroidery more relaxing and helps maintain creative momentum throughout your project.
Transferring Designs and Choosing Patterns

One of the most crucial steps in personalizing your denim is mastering the art of pattern transfer onto thick, dark fabric. Traditional tracing methods that work on lighter materials often fail with sturdy denim.
Printing and Applying Your Stencil
Water-soluble stabilizer offers the most reliable method for this challenging transfer process. You can print your chosen design directly onto this special paper using a regular home printer.
Ensure your pattern has bold, clear lines that will remain visible as you stitch. Cut out the printed stencil and peel away the backing before carefully positioning it on your denim.
Techniques for Marking Thick, Dark Denim
Different transfer methods suit various projects and skill levels. Each approach has distinct advantages for working with dark denim fabric.
| Transfer Method | Best For | Pros | Cons |
|---|---|---|---|
| Carbon Transfer Paper | Simple designs | Easy to use | Lines may smudge |
| Tracing Paper | Experienced crafters | Precise lines | Can tear during stitching |
| Water-Soluble Stabilizer | All skill levels | Dissolves completely | Requires printer access |
When working near seams, pay close attention to how your pattern lays over varying fabric layers. This careful placement prevents gaps in your final embroidery work.
For symmetrical designs, simply flip your transfer paper to create mirror images. This technique ensures balanced results across both sides of your garment.
Basic Stitches and Techniques for Embroidery

The beauty of hand sewing lies in learning fundamental stitches that transform plain fabric into personalized artwork. While countless variations exist, mastering just a few essential techniques allows you to create stunning, professional-looking designs.
Exploring Chain, Satin, and Backstitch Options
The chain stitch creates beautiful looped lines perfect for outlines and decorative elements. Bring your needle up from the back, create a loop, then push back down through the starting point. Repeat to form a connected chain of stitches.
Satin stitch fills solid areas like flower petals or leaves beautifully. Work both sides separately with a gap down the middle. Angle your stitches to follow the natural shape for dimensional effect.
Backstitch creates clean, continuous lines ideal for stems and outlines. This method provides structural definition to your designs. It’s an essential technique for any hand embroidery project.
For practical threading, cut your thread about the span of your arm to prevent tangling. Always knot the end securely before beginning. Use thread conditioner if the material begins to look worn.
Remember that embroidered items will be worn and washed regularly. Avoid making stitches that are too large and might snag easily. Keep stitches appropriately sized for durability.
Don’t feel overwhelmed by the variety of stitches available. Even using just one or two basic techniques can create beautiful, impressive results on your projects.
DIY Embroidery on Jeans: Step-by-Step Process
The magic happens when needle meets thread, transforming your plain denim into a personalized masterpiece. This hands-on step is where your vision becomes a tangible piece of art.
Setting Up Your Embroidery Hoop and Water-Soluble Stabilizer
Start by placing the inner ring of your embroidery hoop beneath the denim, centering your design. Snap the outer ring on top and tighten the screw until the fabric is taut. Avoid over-stretching.
Remove the fabric from the hoop between sessions. This prevents permanent ring marks called “hoop burn.” For small areas or tricky spots like pockets, you can often work without a hoop. The sturdy nature of denim provides excellent stability.
Stitching Methods and Securing Your Design
When stitching on jeans, the sewing method is very helpful. Keep your hand on the front of the work, dipping the needle through the fabric. This is ideal for angled stitching.
Always pull pockets out of the way before you begin. Check the back side of your work regularly to ensure stitches are neat and not tangled.
If a needle is hard to pull through, try a larger size or a needle puller. Protect your fingers with rubber thimbles during long sessions.
Here’s a quick guide to handling common challenges:
| Challenge | Solution | Pro Tip |
|---|---|---|
| Thick seam areas | Use a stronger needle | Go slow and steady |
| Running out of thread | Create a secure knot on the back | Tuck needle under last stitch to form a loop |
| Messy backside | Check after every few stitches | Neat backs prevent lumps |
To finish a length of thread, leave slack to tie a knot on the back. Tuck your needle under the last stitch, pull through the loop, and tighten. Repeat this step for a secure knot that will hold through wear and washing.
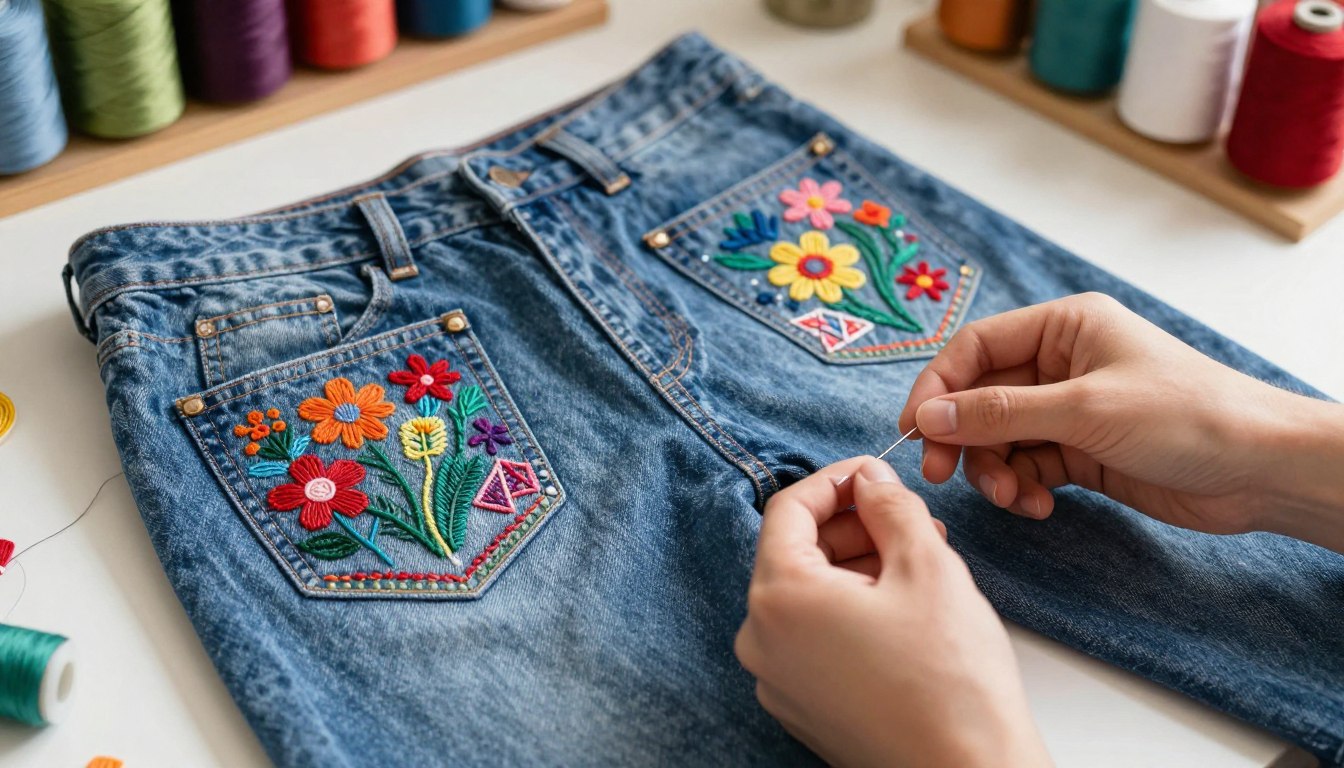
Creative Design Ideas and Placement Tips on Denim

Your creative vision truly comes alive when you explore different design styles and strategic placement on your denim pieces. This is where personal expression meets practical application.
Embroidering on Pockets, Hems, and Seams
Back pockets offer a classic canvas for showcasing your work. They provide a flat surface perfect for detailed designs. For a subtler look, try stitching borders around front pockets or along the bottom hem.
Side seams and areas under front pockets are excellent for symmetrical patterns. Mirror your design on each side for a balanced, professional finish. This placement creates visual harmony across your jeans.
Mixing Floral and Geometric Patterns for Unique Looks
Bold flowers remain incredibly popular. Create stunning roses using satin stitch with maroon, pink, and pale pink petals. Add texture with French knots in mustard thread for the centers.
Geometric patterns offer a modern alternative. Satin-stitched triangles or lines create contemporary statements. They work beautifully in corner areas and along hems.
Don’t hesitate to combine these styles. A geometric border can frame a delicate flower motif perfectly. This mixing technique results in truly unique embroidered jeans that reflect your personal style.
Conclusion
Your handcrafted piece now stands ready to showcase your unique style. After securing all threads with proper knots on the back side, trim excess floss while leaving an inch-long tail. Apply iron-on backing to protect your beautiful work.
Gently wash away the stabilizer and let your creation dry completely. The pride of wearing something you made yourself is unmatched. This way of updating clothes gives them new life and personality.
Your skills with needle and thread can extend beyond this project. Consider adding stitches to jackets, bags, or other garments. Each new design builds your confidence and creativity.
Every stitch you make represents your personal touch. Continue exploring different patterns and techniques. Your growing collection of personalized items will reflect your evolving style for years to come.
FAQ
What’s the best way to transfer a pattern onto dark denim fabric?
Which stitches are strongest and best for decorating clothes like jeans?
Do I need a hoop for this kind of hand embroidery project?
How do I secure the thread and knots so my work doesn’t come undone?
What are some fun design ideas for decorating back pockets or hems?
How should I care for my newly decorated denim after finishing the stitching?

Eduard Kingly is a travel and lifestyle content creator with a focus on personal development and education. He combines firsthand travel experiences with research-driven insights to guide readers in discovering new places, building better habits, and pursuing meaningful learning.