How to Crop a T-Shirt (Step-by-Step)
“Fashion is the armor to survive the reality of everyday life.” – Bill Cunningham. This iconic quote captures the power of personal style. It’s about creating something that makes you feel confident and unique.
Right now, the crop top is a major fashion statement. It’s perfect for showing a bit of midriff or pairing with high-waisted bottoms. This look offers great proportions and a modern vibe.
You can buy a pre-made crop top, but there’s a better way. Transforming an existing shirt yourself gives you complete control. You decide the exact length and style that works for you.
This guide makes the process simple. We cover everything from a basic cut to creative no-sew options. Our friendly instructions ensure your DIY project is fun and successful, even for beginners.
Key Takeaways
- Crop tops are a versatile and trendy wardrobe staple.
- DIY projects allow for full customization of length and fit.
- Transforming a regular shirt is easier than you might think.
- Multiple techniques will be covered, including no-cut alternatives.
- The guide is designed to be beginner-friendly.
- You can repurpose old shirts into unique fashion statements.
- Learn styling tips and care instructions for a professional finish.
Introduction to Crop Tops

Transforming ordinary shirts into trendy crop tops offers creative freedom. This approach lets you design the perfect garment for your unique body and personal taste.
The Appeal of DIY Crop Tops
Creating your own crop top provides complete control over the final product. You decide the exact length, fit, and overall look that works best for you.
This method saves money while reducing fashion waste. Instead of buying new items, you repurpose clothing you already own. The economic and environmental benefits make this a smart choice.
Selecting different base shirts creates varied styles. An oversized tee becomes a roomy, relaxed crop top. A fitted shirt transforms into a trendy “baby tee” style that hugs your curves.
Why Transform Your Old Shirts?
Store-bought options often lack middle-ground lengths. Most retail crop tops come in limited sizes and styles. DIY projects solve this problem perfectly.
Anyone can wear a customized crop top with confidence. While popular among young women, this fashion choice works for all ages and body types when styled thoughtfully.
Repurposing sentimental shirts preserves special memories. Concert tees and vintage finds gain new life as contemporary fashion statements. This creative process feels rewarding and personal.
| Feature | DIY Crop Top | Store-Bought Crop Top |
|---|---|---|
| Customization | Full control over length and fit | Limited standard sizes |
| Cost | Uses existing wardrobe items | New purchase required |
| Sustainability | Reduces clothing waste | Contributes to fast fashion |
| Uniqueness | One-of-a-kind design | Mass-produced item |
Trending Crop Top Styles

Exploring different crop top styles reveals a spectrum of looks from casual to chic. The beauty of DIY fashion lies in transforming basic shirts into personalized statements that reflect your unique taste.
From Oversized Tees to Fitted Crop Tops
Oversized shirts create relaxed, boxy crop tops perfect for casual days. This comfortable style maintains the fashionable cropped element while offering a laid-back vibe.
Fitted options provide a polished, trendy appearance. Form-hugging designs create the popular “baby tee” aesthetic that pairs beautifully with high-waisted bottoms.
Creative variations add exciting dimensions to your wardrobe. Off-the-shoulder styles offer feminine appeal, while fringe details bring bohemian flair. Laced-up designs create edgy fashion statements.
Layering different colored crop tops adds visual interest through intentional color blocking. The possibilities for personalization are truly endless, allowing you to experiment until you find your perfect style.
Essential Materials for a DIY Crop Top

Before you make the first cut, gathering the right gear is your first step to a perfect finished product. Having the proper materials on hand makes the difference between a project that looks store-bought and one that looks homemade.
This preparation ensures a smooth, enjoyable process and a result you’ll love to wear.
Materials Checklist
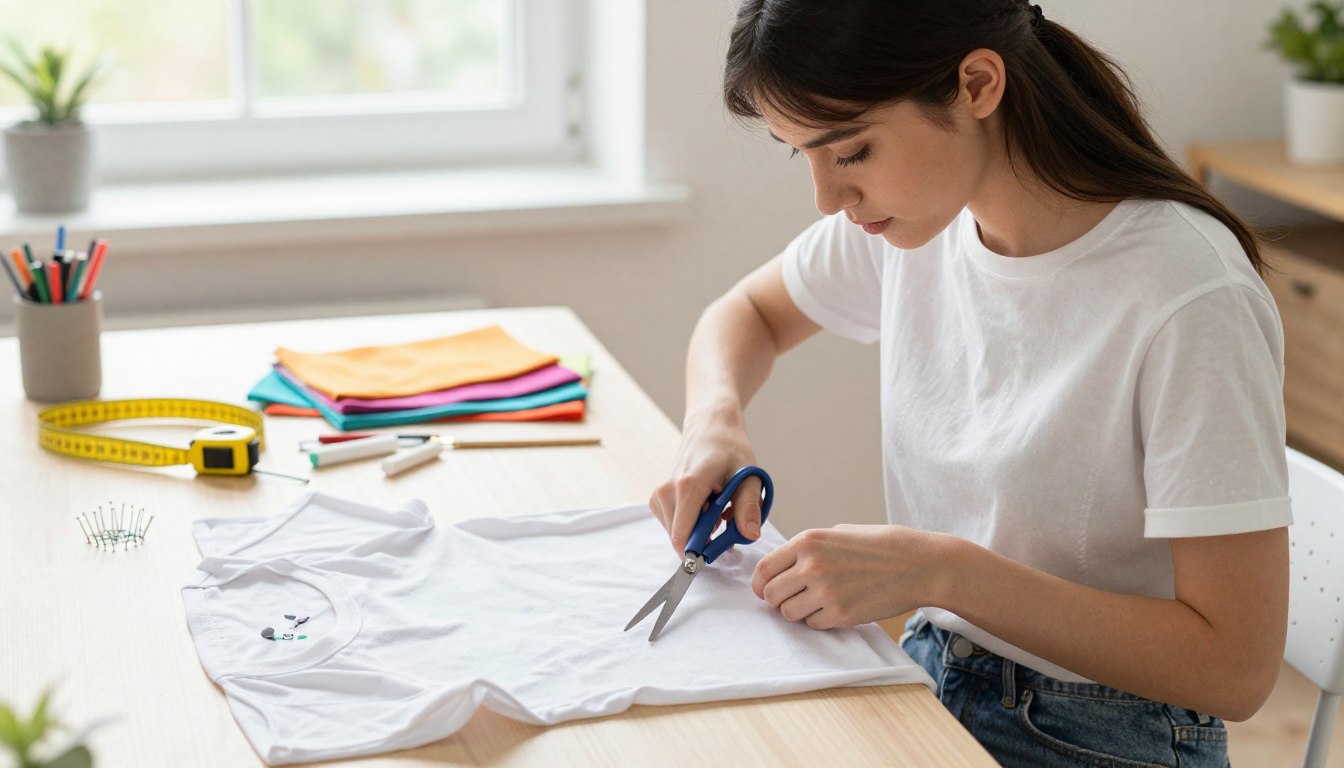
You will need more than just any old scissors and a shirt. A sharp pair of fabric scissors is non-negotiable for a clean cut. Regular paper scissors will chew through the fabric, leaving frayed, messy edges.
Precision is key. A ruler or measuring tape guarantees a straight hemline. Use washable chalk or a fabric marker to draw your cutting line. This allows for easy changes.
Pins are your best friend for keeping the shirt stable. An iron is optional but helpful for smoothing wrinkles before you start. This gives your final piece a polished look.
When selecting a shirt, cotton or cotton-blend fabric works best. These materials are easy to cut cleanly. Stretchy synthetics can be tricky and tend to fray. Modal is a great choice as it resists fraying beautifully.
Prepping Your Workspace
Find a clean, spacious flat surface like a table or countertop. This is the ideal place to work. You need enough room to spread your shirt out completely without any wrinkles or bumps.
A smooth flat surface is crucial for accurate measuring and cutting. It prevents the fabric from shifting, ensuring your cuts follow the marked lines perfectly. A well-prepared place sets the stage for success.
How to Crop a T-Shirt (Step-by-Step)

Ready to give your favorite tee a stylish new look? This hands-on guide walks you through each stage of the transformation process. You’ll create a custom piece that fits your exact preferences.
Measuring & Marking Your Shirt
Start by trying on your chosen shirt in front of a mirror. Fold the bottom upward to test different lengths. A common choice lands a few inches above your belly button.
Use fabric chalk to mark your preferred spot. Remember: you can always cut more fabric later. It’s better to start conservative with your initial marking.
Measure from both shoulders down to ensure an even hemline. Draw a dashed cutting line using a ruler as your guide. This method allows for easy adjustments if needed.
Cutting and Securing for a Clean Line
Before cutting, secure your shirt properly. Use pins or heavy objects to keep the fabric stable. Strong tape works well to prevent shifting during cutting.
Sharp fabric scissors are essential for a clean edge. Cut slowly along your marked line. Precision here ensures a professional-looking result for your new crop top.
Finishing Touches with an Iron
Lay your freshly cut shirt flat on an ironing board. Pressing with an iron smooths any wrinkles. This final step gives your creation a polished appearance.
If you prefer, a warm dryer cycle can achieve similar results. Note that jersey knit fabric may roll at the edges. You might need to account for this when choosing your final length.
Alternative No-Cut Methods to Create a Crop Top
Not ready to commit to a permanent alteration? No-cut methods offer the perfect solution. These clever techniques let you achieve a cropped look without altering your favorite shirt. You can enjoy the style today and wear the garment full-length tomorrow.
This approach is ideal for experimenting with the trend. It works wonderfully with sentimental tees you don’t want to cut. The best part is the instant transformation with zero risk.
The Knot Tie Technique
The classic knot is the easiest way to make a crop top without cutting. Simply grab the bottom front fabric of your shirt while wearing it. Twist the gathered material and tie it into a secure knot.
You can position the knot at the front, back, or side. The front knot creates a casual, effortless vibe. This method works best with shirts that have some extra length.
Tuck and Twist Method
For a smoother finish, try the tuck and twist. Fold the bottom hem of your shirt under itself. Then, twist the excess fabric at your sides or back.
Tuck the twisted material neatly into your waistband. You can also secure it under a bralette or tank top. This creates a clean, gathered appearance.
Using a Belt or Hair Tie
Accessories can help create your cropped shirt. If your shirt is too short to knot, use a hair tie. Gather the fabric at your waist and secure it with the elastic.
Then, tuck the gathered “ponytail” up into the shirt to hide it. A belt worn over the shirt also works well. Pull the fabric up over the belt and tighten it to hold the fold in place.
| Method | Best For | Effort Level |
|---|---|---|
| Knot Tie | Shirts with extra length | Easy |
| Tuck & Twist | A seamless, tucked look | Medium |
| Hair Tie | Shorter shirts | Easy |
| Belt Tuck | Creating a defined waist | Medium |
These reversible techniques provide incredible flexibility. You can change your style in seconds. It’s a fantastic way to explore the crop top trend with confidence.
Styling Your Cropped Shirt Look
The real magic happens when you incorporate your new creation into complete outfits. Your cropped shirt becomes the centerpiece of versatile ensembles that reflect your personal style. Let’s explore how to build looks that make you feel confident.
Pairing with High-Waisted Bottoms
High-waisted jeans create the classic combination for balanced proportions. This pairing ensures comfort while showcasing your trendy crop top.
Don’t limit yourself to denim. High-waisted pants of any style work beautifully. Wide-leg trousers and dress pants offer sophisticated options.
For feminine flair, try your shirt crop with high-waisted skirts. This creates chic silhouettes perfect for various occasions.
Concerned about coverage? Choose a longer, boxier crop top. Paired with high-waisted jeans, it provides full coverage while maintaining the fashionable look.
Layering and Accessorizing for a Trendy Look
Creative layering adds depth to your outfit. Try two crop tops together in contrasting colors for bold statements.
For cooler weather, layer a short-sleeve cropped shirt over long sleeves. Off-the-shoulder styles look fantastic with visible bralettes underneath.
Accessories complete your look. Statement jewelry draws attention to your silhouette. Experiment to find combinations that make you feel most confident.
Caring for and Maintaining Your DIY Crop Top
After crafting your perfect crop top, the right care routine preserves its professional finish. Proper maintenance keeps your creation looking fresh and extends its lifespan significantly.
Washing and Drying Guidelines
Natural fabric like cotton requires gentle handling. Wash with cold water to prevent shrinkage. Always check the original shirt‘s care label first.
Turn your crop top inside out before washing. This protects the hem and prevents pilling. Wash with similar colors to avoid fading.
Air drying is your best option. Machine drying can cause unwanted shrinkage. Remove any excess water gently before hanging.
Proper Storage Tips
Proper storage prevents wrinkles and damage. Fold your shirt neatly or hang it in a clean closet. Keep it away from direct sunlight.
Make sure your care routine includes regular inspection. For delicate pieces, consider using garment bags. This protects the fabric from dust and snags.
Your shirt will maintain its shape with thoughtful handling. These simple steps ensure your DIY creation stays beautiful for many wears.
Conclusion
You’ve now unlocked the creative potential to refresh your entire clothing collection. With this comprehensive guide, you possess all the knowledge needed to confidently transform your wardrobe.
Start experimenting with the various techniques covered. Whether you choose the permanent cutting method or flexible no-cut options, each approach offers unique advantages for your personal style.
The beauty of DIY fashion lies in expressing yourself while being sustainable. You can customize fit and breathe new life into existing wardrobe pieces. Don’t stop at t-shirts—try cropping hoodies or crewnecks for trendy sweatshirt tops.
Remember, practice makes perfect. Your first attempt might not be flawless, but each project builds skills. Share your creations and favorite methods with fellow fashion enthusiasts.
Fashion should be fun, personal, and accessible. Creating your own crop top is an empowering way to take control of your style. Now go make that perfect crop shirt you’ve been dreaming of!
FAQ
What is the best type of shirt to use for a DIY crop top?
Can I make a crop top without cutting my shirt?
How do I prevent the fabric from fraying after I cut it?
What’s the easiest way to style a cropped shirt?
How short should I cut my shirt for a crop top?
What if I don’t have sharp fabric scissors?

Sharon Molly is a content creator in lifestyle, fashion, and travel, delivering style-savvy advice and destination insights to inspire confident living. With a background in digital media, she combines aesthetics with practical guidance for modern women on the go.