How to Do Perfect Winged Eyeliner
Taylor Swift captured the power of this iconic makeup look perfectly: “draw the cat eye sharp enough to kill a man.” That fierce, confident attitude is exactly what a sharp flick can bring to your entire look.
It’s no wonder this style remains a top trend. A recent beauty report revealed that one in five women want to learn this technique. Over thirty percent of beauty lovers name it as their favorite trend.
Creating that flawless wing might seem tricky. You need a steady hand and an eye for symmetry. But don’t worry. This guide breaks the process into simple, manageable steps.
With the right techniques and a little practice, anyone can master this coveted look. We’ll cover everything from preparation to product picks. Get ready to unlock a new level of confidence with your makeup.
Key Takeaways
- The winged eyeliner is a highly popular and desired makeup technique.
- Achieving the look requires precision but is manageable with the right guidance.
- Proper preparation and tool selection are crucial for success.
- This guide provides step-by-step instructions suitable for all skill levels.
- Mastering this technique can add a powerful, confident element to your style.
Introduction to the Allure of Winged Eyeliner

From ancient Egyptian royalty to modern runway models, the cat eye has transcended centuries. This dramatic style creates an instant transformation that many find irresistible.
The appeal lies in its ability to convey strength and elegance simultaneously. A recent beauty survey confirms this trend’s dominance, with 31% of enthusiasts naming it their favorite.
The Timeless Appeal of Cat Eyes and Winged Looks
What makes this eye-defining technique so enduring? It creates a lifted, elongated appearance that enhances natural eye shape. The result is instantly captivating.
Makeup artist Pat McGrath once noted, “A sharp wing speaks volumes without saying a word.” This speaks to the psychological power behind the look.
People are drawn to winged eyeliner because it conveys confidence and sophistication. The dramatic flair makes wearers feel empowered and unique.
What Makes the Perfect Winged Look So Popular?
Versatility is key. This technique adapts from subtle daytime applications to bold evening statements. Each variation offers distinct personality.
The challenges—symmetry, precision, clean lines—actually contribute to its appeal. Mastering these elements feels like a personal achievement.
| Style Variation | Best For | Difficulty Level |
|---|---|---|
| Subtle Flick | Everyday Wear | Beginner |
| Classic Wing | Evening Events | Intermediate |
| Graphic Statement | Special Occasions | Advanced |
Cat-eyes and winged tips are meant to reflect individual personality. The goal isn’t perfect replication but personal expression through this art form.
Preparation for a Flawless Application

Creating that sharp, flawless wing requires more than just a steady hand—it starts with proper preparation. The canvas you create determines how your liner will look and last throughout the day.
A well-prepared base ensures your hard work doesn’t smudge or fade. This foundation step is often overlooked but makes all the difference.
Priming Your Eyelid: Concealer and Eyeshadow Primer Essentials
Begin by applying eyeshadow primer or concealer under your eyes and across your lids. Blend thoroughly to create a smooth, even surface.
This step helps your liner adhere better and appear more vibrant. When selecting concealer, choose oil-free formulas to prevent smudging.
Proper blending avoids visible product lines. Your skin should look natural, providing the perfect base for precise application.
Establishing a Base with Light Eyeshadow
Apply eyeshadow before your liner to prevent smudging. A neutral shade creates dimension while keeping focus on your wing.
For everyday looks, keep eyeshadow subtle. Save dramatic combinations for special occasions.
Allow primer and eyeshadow to set completely. This ensures the best surface for clean, sharp lines that define your lash line beautifully.
Mastering the Basics: Techniques & Tools
Before attempting that sharp flick, understanding the different eyeliner options available is crucial. The right formula can transform your application experience from frustrating to flawless.
Each type offers unique advantages for various skill levels and desired outcomes. Knowing which one suits your needs makes all the difference.
Choosing the Right Eyeliner: Pencil, Liquid, or Gel?
For beginners, an eyeliner pencil provides superior control and easy correction. Keep your pencil sharpened for precise application along the lash line.
This type allows for soft, smudged effects that create an effortless look. It’s perfect for practicing your wing technique without pressure.
Liquid eyeliner delivers intense pigmentation and sharp lines. Felt tip applicators offer extra precision for dramatic wings.
Many prefer liquid liner for its bold, long-lasting results. The fine tip creates clean edges that define your eyes beautifully.
Gel formulas combine the best of both worlds. They offer liquid-like intensity with slightly more blendability before setting.
Using an angled brush with dark powder eyeshadow creates soft wings for practice. This method helps build confidence before moving to permanent formulas.
Consider your eye shape when selecting tools. Different tips and brushes work better for various anatomical features.
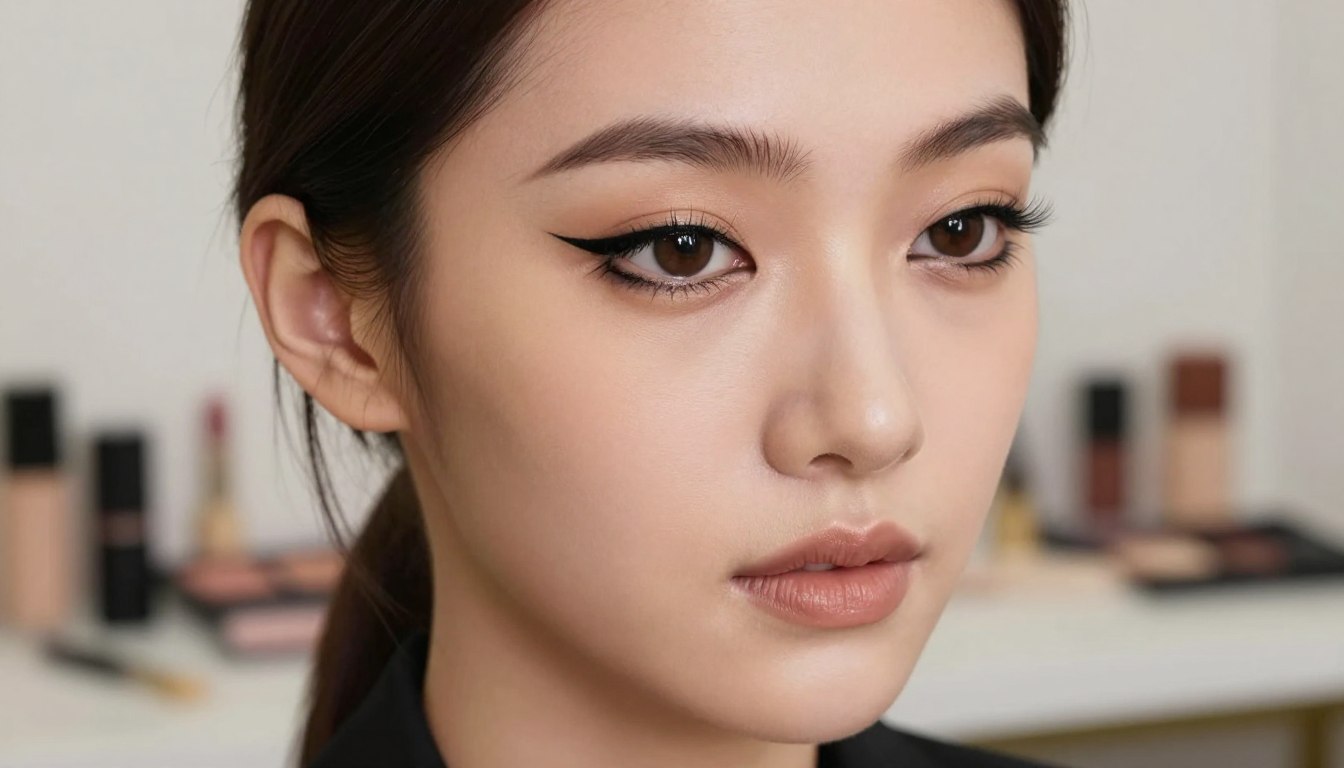
How to Do Perfect Winged Eyeliner: Step-by-Step Techniques

The journey to achieving that coveted cat-eye starts with proper positioning and technique. Expert makeup artist Alicia D’Angelo suggests beginning with eyes open rather than closed.
Sketch different wing shapes using an angled brush with light-toned eyeshadow first. This allows you to visualize the result without commitment to permanent liner.
Sketching the Wing and Creating the Guideline
Apply pencil eyeliner along your upper lash line as close as possible to the lashes. Work from the inner corner toward the outer corner using small dashes instead of one continuous stroke.
Keep your eyelid flat by tilting your head back and barely keeping your eye open. Use your pinky finger to hold the lid taut for better control.
To measure wing placement, hold your liner at the endpoint of your bottom lash line. Point it diagonally upward as a continuation of the lower lash line.
Connecting the Lines: From Upper Lash Line to the Outer Corner
Draw a thin diagonal line at roughly 45 degrees heading toward your eyebrow’s end. The length depends on your preference—shorter for subtle looks, longer for dramatic effects.
Makeup artist Hannah Martin offers reassuring advice: “You don’t have to do one perfect line in one perfect stroke. Just do lots and lots of little strokes that you blend together as you work to create your line.”
Draw a straight line from the wing tip down to the middle of your upper lash line. Fill in the outline completely, ensuring the liner sits close to the lashes to prevent visible gaps.
| Application Method | Best For | Control Level |
|---|---|---|
| Dashed Strokes | Beginners | High Control |
| Continuous Line | Advanced Users | Requires Practice |
| Shadow Sketching | Planning Phase | Zero Commitment |
Thicken the line at the inner eyelid using short strokes. Keep the innermost corner thinnest for natural gradation that enhances your eye shape beautifully.
Tips for Different Eye Shapes

Your unique eye shape is the secret to unlocking a winged liner look that truly complements your natural beauty. IPSY Chief Makeup Artist Ash K Holm emphasizes that customized application methods make all the difference.
Enhancing Upturned, Downturned, and Almond Eyes
For upturned eyes, create an extra-graphic wing using gel liner. Draw a scalene triangle outline on the outer corner along your upper lash line. Extend one leg down to the bottom lash line for a dramatic effect.
Downturned eyes benefit from a technique that lengthens and lifts. Start lining from the center of your eyelid where the pupil rests. Work outward toward the outer corner with eyes open.
Almond eyes can use the classic “outside-in” method. Draw a straight line from the upper outer corner to the center of your lash line. Form the wing tip by drawing another line underneath.
Special Considerations for Hooded and Monolid Eyes
Hooded eyes require looking straight into the mirror without raising your chin. Draw a thin, delicate line from inner to outer corners. Opt for a straighter, 60s-inspired wing to avoid the crease.
Monolid eyes benefit from short feathery strokes along the upper lash line. Work from inner to outer corner with eyes open. Drag the liner tip upward at the last eyelash toward your brow’s tail end.
“The step-by-step guide to applying winged eyeliner depends entirely on your eye shape.”
| Eye Shape | Recommended Technique | Liner Type |
|---|---|---|
| Upturned | Scalene triangle wing | Gel liner |
| Downturned | Center-out application | Liquid or pencil |
| Almond | Outside-in method | Any formula |
| Hooded | Straight line wing | Thin liquid |
| Monolid | Feathery strokes | Angled brush |
Common Challenges & How to Fix Them
Even the most experienced makeup enthusiasts encounter eyeliner mishaps that need quick fixes. The pressure to create flawless lines often leads to frustration, but professional techniques make corrections simple.
One major mental barrier is expecting perfection on the first attempt. This mindset actually increases mistakes. Remember that even experts refine their work after initial application.
Correcting Mistakes with Makeup Remover and Concealer
When your liner looks jagged, dip an angled brush in makeup remover. Carefully trace over uneven edges to smooth the line. Pointed cotton swabs work better than round ones for precise cleanup.
Ash K Holm shares a pro technique: “To make your eyeliner extra sharp, pick up a clean angled brush with some concealer, and sweep it under the wing.” This creates crisp edges while fixing mistakes.
Specialized tools like the HALF MAGIC BEAUTY Flik Eraser Makeup Correcting Pen simplify cleanup. For super sharp wings, swipe a remover-dipped cotton bud from the outer corner toward your temple.
Concealer masks errors beautifully when applied with fingers, brushes, or swabs. This refinement step transforms good makeup into flawless results. Your skin stays clean while wings gain definition.
Innovative Hacks for Beginners and Pros
Creative tools and methods can transform the challenging process of creating sharp wings into an enjoyable experience. These clever shortcuts provide structural support that builds confidence while delivering professional results.
Utilizing Tape, Stencils, and “Training Wheel” Methods
The connect-the-dots approach breaks application into manageable steps. Instead of one perfect stroke, create small dots along your lash line and connect them.
For straight, crisp edges, try the tape method. Place a piece of tape from your eye’s outer corner toward your brow end. First, reduce stickiness by pressing the tape on your hand a few times.
Position the tape carefully along your lower lash line angled upward. Press it firmly against skin to prevent liner from bleeding through. Draw your line along the upper lash line close to lashes, extending to the tape edge.
Trace along the tape’s edge from the endpoint upward. Don’t worry if liner gets on the tape—it won’t affect your crisp wing. Wait for complete drying before gently removing the tape.
Alternative stencils like credit cards offer reusable guides. These tools provide the steady hand you need for flawless application every time.
| Hack Method | Best For | Ease Level |
|---|---|---|
| Connect-the-Dots | Building Confidence | Beginner Friendly |
| Tape Guide | Sharp, Straight Lines | All Skill Levels |
| Credit Card Stencil | Reusable Application | Quick & Easy |
These innovative approaches remove intimidation from the process. They provide the framework for beautiful results while you develop your skills.
Product Recommendations and Expert Insights>
Finding the right tools can transform your winged liner application from frustrating to flawless. The best products combine precision application with long-lasting wear tailored to your unique features.
Top Eyeliner Products and Tools to Elevate Your Look
For upturned eyes creating siren-eye looks, gel liner like ONE/SIZE delivers ideal sharpness. This formula blends slightly before setting into 24-hour wear.
Downturned eyes need maximum staying power. The R.E.M. BEAUTY At The Borderline Eyeliner Marker stays locked in place all day despite blinking patterns that cause flaking.
Monolid eyes benefit from felt tip liquid eyeliner like PÜR On Point Waterproof Liquid Eyeliner Pen. The precise tip creates dimension-building strokes that enhance natural contours.
Ash K Holm recommends soft, blendable formulas for round eyes. FENTY BEAUTY Flypencil offers longwear in a pencil format with four versatile shades.
Almond eyes shine with bold graphic looks. IL MAKIAGE Black Card Waterproof Liquid Eyeliner features an ultra-thin flexible tip that never smudges through activities.
Specialized tools like the 3-Dot Liner simplify filling spaces between lashes. Applied close to the lash line, it creates beautiful straight lines that intensify your eyes.
Waterproof eyeliner pencil serves as perfect beginner options for hooded eyes. These offer control and forgiveness while building confidence with the technique.
Conclusion
With the right techniques and a bit of patience, anyone can achieve stunning eye-defining results. The biggest hurdle is often the mental stress of expecting perfection on the first try.
Remember that makeup should be enjoyable. Once you relax, the entire process becomes fun. You now have clever tricks like the concealer method for sharp edges and the tape guide for effortless wings.
Modern eyeliner formulas have improved dramatically. When you nail your winged eyeliner look, it will stay flawless all day. Consistent practice is key, but these shortcuts speed up your progress.
Customize each step for your unique eye shape. This personalized approach ensures the most flattering results for your eyes. Your winged eyeliner should reflect your individual confidence and style.
FAQ
What is the best type of eyeliner for creating a winged look?
How can I make my winged eyeliner even on both eyes?
I have hooded eyes. How do I prevent my winged liner from transferring?
What’s the easiest way to fix a mistake with winged eyeliner?
Are there any tricks to help me draw a straight line for the wing?

Eduard Kingly is a travel and lifestyle content creator with a focus on personal development and education. He combines firsthand travel experiences with research-driven insights to guide readers in discovering new places, building better habits, and pursuing meaningful learning.